 listicle
Best Yoga Poses for Chronic Joint Pain
Table of Contents
- Why Yoga Works for Chronic Joint Pain
- Top Yoga Poses for Chronic Joint Pain Relief
- Modifications for Yoga With Joint Pain
- Yoga Poses to Avoid With Osteoarthritis
- Yoga for Arthritis Pain Relief
- Safety Precautions and When to Seek Professional Guidance
- Getting Started With Your Yoga Practice
- Frequently Asked Questions
Last Updated: October 1, 2026
Chronic joint pain affects millions of people, but gentle movement, particularly yoga poses for chronic joint pain, can reduce stiffness, improve flexibility, and ease discomfort when done correctly. Below, we'll show you exactly which poses work best, how to modify them safely, and what to avoid.
Why Yoga Works for Chronic Joint Pain
Yoga combines low-impact movement with breathwork and mindfulness to reduce muscle tension and stress. Gentle poses gradually increase range of motion without jarring impact, allowing synovial fluid to flow more freely and reducing inflammation and stiffness from inactivity.
The psychological component matters equally. Chronic pain often creates a cycle of tension and anxiety that amplifies discomfort. Mindfulness practices embedded in yoga interrupt this cycle by shifting your focus away from pain and toward breath and body awareness. Research from Johns Hopkins Arthritis Center confirms that gentle yoga poses for chronic joint pain improve mobility and reduce pain intensity when practiced consistently.
Yoga respects your body's current limitations by working within a comfortable range and gradually expanding it. This approach works for osteoarthritis, rheumatoid arthritis, fibromyalgia, and general joint stiffness from age or injury.
Top Yoga Poses for Chronic Joint Pain Relief
The following poses are specifically chosen for their ability to improve joint mobility and flexibility while remaining low-impact and accessible. Each can be modified with props and positioning adjustments based on your individual needs.
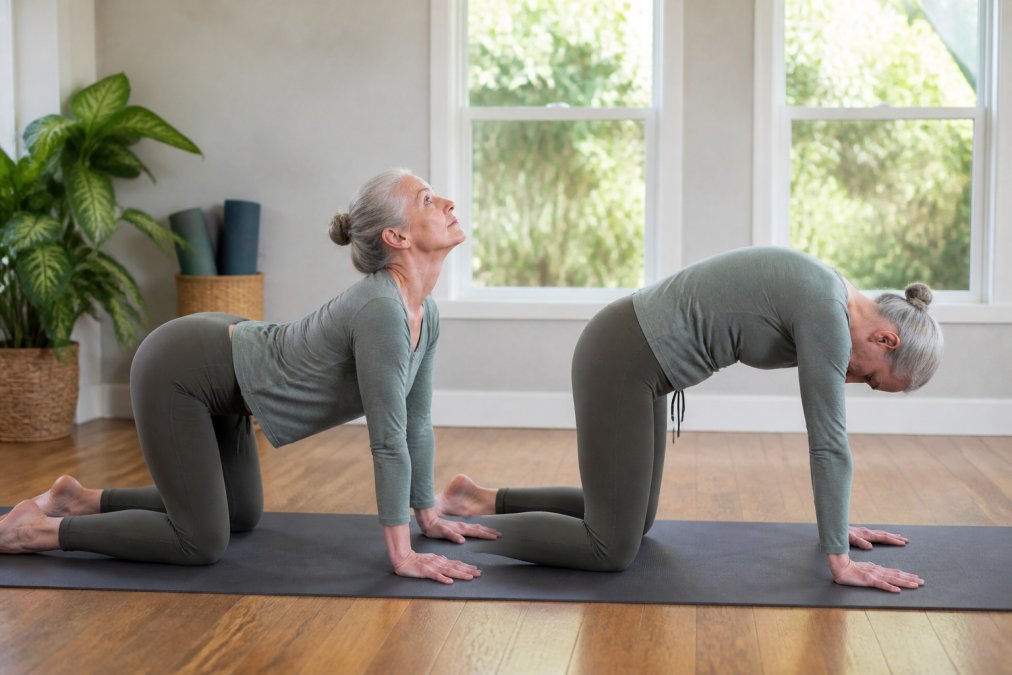
Cat-Cow Pose
Cat-Cow alternates between two positions, creating gentle spinal movement that mobilizes each vertebra and is particularly helpful for the spine, hips, and shoulders.
How to perform it:
- Start on your hands and knees with wrists under shoulders and knees under hips
- Inhale and drop your belly toward the mat while lifting your gaze (Cow position)
- Exhale and round your spine, drawing your chin toward your chest (Cat position)
- Move slowly between positions, syncing movement with your breath
- Repeat 8-10 times, moving only as far as feels comfortable
This pose warms up the spine, increases synovial fluid production, and engages your core without demanding strength you may not yet have.
Child's Pose
Child's Pose gently stretches the hips, lower back, and shoulders while calming your nervous system, and is one of the safest poses because you control the depth of the stretch.
How to perform it:
- From hands and knees, bring your big toes together and separate your knees wide
- Sink your hips back toward your heels
- Rest your forehead on the mat or on a block
- Let your arms extend forward or rest alongside your body
- Breathe deeply for 30 seconds to 2 minutes
If this position bothers your knees, place a rolled towel behind them; if your hips are tight, place a pillow between your hips and heels.
Bridge Pose
Bridge Pose strengthens the glutes and hamstrings while building supportive muscle around the knee joint without direct stress on it.
How to perform it:
- Lie on your back with knees bent and feet flat on the floor, hip-width apart
- Press your feet into the mat and lift your hips toward the ceiling
- Clasp your hands under your back and press your shoulders down
- Hold for 20-30 seconds, breathing steadily
- Lower slowly and rest before repeating 3-5 times
Tree Pose
Tree Pose develops balance and body awareness while working the hip stabilizers, which is crucial for preventing falls and improving functional movement.
How to perform it:
- Stand with feet hip-width apart, arms at your sides
- Shift weight onto your left foot
- Place your right foot on your inner left thigh or calf (avoid pressing directly on the knee)
- Bring your hands to heart center or extend them overhead
- Hold for 20-30 seconds, then switch sides
Downward-Facing Dog (Modified)
Downward-Facing Dog can be intense for people with joint pain. The modified forearm version provides spinal decompression and shoulder mobility benefits without overwhelming tight joints.
How to perform it:
- Start on hands and knees
- Place your forearms on the mat with elbows under shoulders
- Press your forearms down and step or walk your feet back
- Your body forms an inverted V-shape, supported by forearms rather than hands
- Hold for 20-30 seconds, breathing deeply
Warrior II (Supported)
Warrior II builds leg strength and improves hip mobility while maintaining a stable, grounded position. The supported version uses a wall or chair to reduce balance demands and joint stress.
How to perform it:
- Stand sideways near a wall, feet about 3-4 feet apart
- Turn your front foot out 90 degrees and back foot in slightly
- Bend your front knee, tracking it over your ankle
- Rest your back hand on the wall for support
- Extend your front arm forward, gaze over your fingertips
- Hold for 20-30 seconds, then switch sides
Modifications for Yoga With Joint Pain
Modifications are smart adjustments that let you practice safely while building strength and flexibility by meeting your body where it is now.
Using Props for Support
Props are essential tools for people with joint limitations. Blocks provide height and support in poses where reaching the floor would strain your joints. Blankets rolled under knees, hips, or neck provide cushioning. A strap around your feet lets you maintain proper alignment without forcing your shoulders or hips into uncomfortable ranges. A bolster or pillow becomes invaluable in restorative poses.
Reducing Range of Motion
Smaller, controlled movements within a comfortable range build strength and flexibility more effectively than forcing deeper stretches. In Cat-Cow, move only halfway through full spinal extension and flexion. In forward folds, bend your knees generously. In hip openers, reduce external rotation by keeping your foot closer to your body. This gradual progression is far more sustainable than aggressive stretching.
Yoga Poses to Avoid With Osteoarthritis
Full Downward-Facing Dog (on hands) places significant weight through wrists and shoulders and can trigger flare-ups. Full Pigeon Pose can be too intense for hip osteoarthritis. Deep forward folds with straight legs often cause compensatory lower back strain. Avoid high-impact or twisting poses, which compress joints and aggravate inflammation. If a pose triggers pain beyond mild discomfort, don't do it. Modifications exist for every pose.
Yoga for Arthritis Pain Relief
Different types of yoga emphasize different qualities. Choosing the right style for your specific situation accelerates progress and makes practice more enjoyable.
Gentle and Restorative Styles
Gentle yoga emphasizes slower movement, longer holds, and greater use of props, ideal for people with active inflammation or severe joint limitations. Restorative yoga uses props to fully support your body in passive poses held for 5-10 minutes, activating the parasympathetic nervous system. Yin yoga involves holding poses for 3-5 minutes to gently stress connective tissue.
How Often to Practice
Practicing 15-20 minutes daily is more effective than one 90-minute session weekly. If daily practice isn't realistic, aim for at least 3-4 sessions per week, including 5-10 minutes of warm-up, 20-30 minutes of pose work, and 5-10 minutes of restorative poses. During flare-ups, reduce intensity but maintain consistency; gentle movement helps manage inflammation better than complete rest.
Safety Precautions and When to Seek Professional Guidance
Always warm up before deeper stretches and move slowly and mindfully. If you experience sharp, shooting pain, stop immediately. If pain persists after a pose, avoid that pose until you've consulted a healthcare provider. Some situations require professional guidance: if you have severe joint damage, recent surgery, or systemic conditions like rheumatoid arthritis, work with a physical therapist or yoga instructor trained in therapeutic modifications.
Getting Started With Your Yoga Practice
| Timeframe | Focus | Duration | Frequency |
|---|---|---|---|
| Weeks 1-2 | Learn proper form and discover comfortable modifications | 15 minutes | 3x/week |
| Weeks 3-4 | Add one new pose; increase hold times slightly | 20 minutes | 3-4x/week |
| Weeks 5-8 | Build to 5-6 poses; introduce gentle transitions | 25-30 minutes | 4-5x/week |
| Week 9+ | Maintain consistency; adjust based on pain levels | 30-40 minutes | 5-6x/week |
Track how your joints feel after each session and the next day. Most people notice reduced stiffness within 2-3 weeks and improved range of motion within 4-6 weeks. Pain reduction typically follows as strength and flexibility improve.
Frequently Asked Questions
What yoga poses should you avoid with osteoarthritis?
Avoid high-impact poses that place excessive stress on joints, such as full Downward-Facing Dog, deep lunges, and full splits. Also skip poses requiring extreme twisting or hyperextension of the spine. Instead, use modified versions with props or reduced range of motion. Always consult with a qualified healthcare provider before starting any new exercise program, especially if you have osteoarthritis, to ensure the poses suit your specific condition.
Is yoga effective for managing chronic joint pain?
Yes, yoga can help manage chronic joint pain by improving flexibility, strengthening supporting muscles, and reducing stress-related tension. Low-impact styles like Yin yoga, Viniyoga, and restorative yoga are particularly beneficial. These approaches emphasize gentle movement, mindfulness, and breathwork to address both the physical and psychological aspects of chronic pain. However, results vary by individual, and it's important to work with a qualified instructor familiar with joint pain modifications.
What modifications help make yoga safer for people with joint pain?
Key modifications include using props like blocks, blankets, and straps to reduce strain; reducing your range of motion in each pose; practicing wall-supported poses for balance; and taking breaks when needed. Props allow you to maintain proper alignment while protecting vulnerable joints. Restorative yoga, which uses extensive props, is ideal for those with significant joint pain. Always move slowly and never push into discomfort; mild stretching is the goal, not intensity.
How often should you practice yoga for joint health?
Most people benefit from 2-4 sessions per week, with rest days in between to allow for recovery. Consistency matters more than intensity. Even 15-30 minutes of gentle yoga several times weekly can improve flexibility, range of motion, and reduce stiffness over time. Start slowly if you're new to yoga, and gradually increase frequency as your body adapts. Your healthcare provider or yoga instructor can recommend a schedule tailored to your specific joint condition.