 how-to
Ergonomic Home Office Setup for Back Pain
Table of Contents
- Why Your Home Office Setup Matters for Back Pain
- Step 1: Choose and Adjust Your Office Chair for Lumbar Support
- Step 2: Position Your Monitor Height for Desk Ergonomics
- Step 3: Set Your Desk Height and Keyboard Placement
- Step 4: Create Your Ergonomic Workstation Checklist
- Step 5: Add Desk Stretches for Back Pain Relief
- Movement Breaks and Posture Changes Throughout Your Day
- When to Seek Professional Assessment for Back Pain
- Frequently Asked Questions
Last Updated: October 14, 2026
Why Your Home Office Setup Matters for Back Pain
Back pain from poor office ergonomics is one of the most common complaints we see at Alternative Health & Healing Center.
Your posture directly affects your lumbar spine.
An ergonomic home office setup isn't just about comfort, it protects your spine during working hours.
This guide walks you through each step to create an ergonomic workstation that supports your lower back and natural spinal curve.
Step 1: Choose and Adjust Your Office Chair for Lumbar Support
Your office chair is the foundation of an ergonomic home office setup. A poor chair forces your body to compensate, straining your neck, shoulders, and lower back; a good one supports your lumbar spine and helps you maintain neutral posture all day.
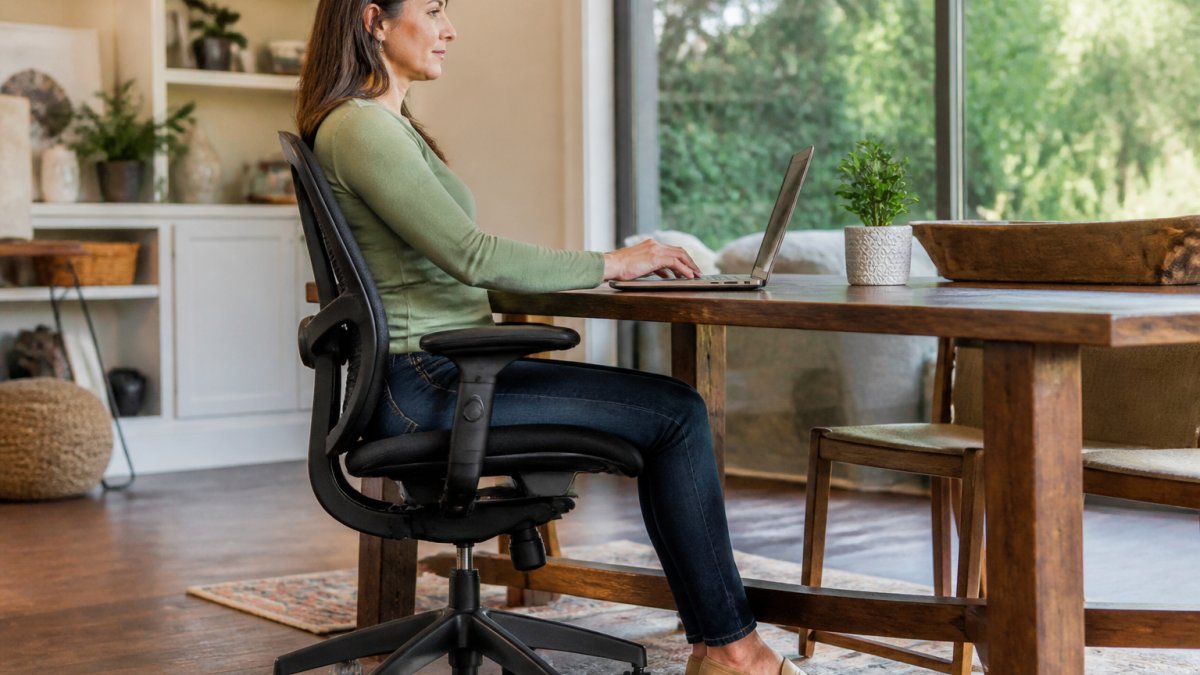
What to Look for in an Office Chair
The best office chairs for back pain have these features:
- Adjustable lumbar support - The backrest should curve inward to support your lower back's natural shape
- Seat height adjustment - Your feet should rest flat on the floor or footrest with knees at 90 degrees
- Armrests - They should support your upper arms without forcing your shoulders up
Buying the cheapest chair is a false economy. A quality chair with proper lumbar support costs more upfront but prevents months of back pain and lost productivity. Test a chair for at least 15-20 minutes before buying.
Adjusting Your Chair for Neutral Posture
Once you have a chair with lumbar support, adjustment is critical:
Step 1: Adjust seat height
- Sit with feet flat on the floor and knees at 90 degrees, thighs parallel to the ground
- If your feet don't reach the floor, use a footrest
- This prevents pressure on the backs of your thighs and reduces lower back strain
Step 2: Set lumbar support
- The backrest curve should match your lower back's natural curve
- The highest point of support should sit at waist level (around your L4-L5 vertebrae)
- Adjust it until it cradles your lower back, supported, not pushed forward
Step 3: Position armrests
- Elbows should rest at 90 degrees with shoulders relaxed
- Armrests should be close enough that you don't reach, but not so close they push your shoulders up, too high causes shoulder tension and neck pain
Step 4: Check your posture
- Back against the backrest, not floating forward
- Shoulders relaxed, not hunched
- Head directly above your shoulders, not jutting forward
Step 2: Position Your Monitor Height for Desk Ergonomics
Monitor height is one of the most overlooked aspects of an ergonomic home office setup.
The correct monitor position keeps your eyes and neck neutral, reducing strain on your neck, shoulders, and upper back, areas that often contribute to lower back pain through postural compensation.
Here's how to position your monitor:
- Distance from your eyes - Your monitor should be 20-26 inches from your eyes (about arm's length when you extend your arm)
- Eye level - The top of your monitor should be at or slightly below eye level when you look straight ahead
- Directly in front of you - Your monitor should be directly in front of your face, not off to the side
- Slight downward angle - Your eyes should look slightly downward (about 15-20 degrees) when viewing the center of the screen
If your monitor is too low, raise it on a stand or stack of books.
Step 3: Set Your Desk Height and Keyboard Placement
Desk height determines how your upper arms, forearms, and wrists position during work. Incorrect height creates strain that radiates down to your lower back through postural compensation.
The correct desk height:
- Your elbows should be at 90 degrees when your arms rest on the desk
- Your forearms should be parallel to the ground, not angled up or down
- Your wrists should be straight and neutral, not bent up, down, or to the side
- Your shoulders should be relaxed, not hunched or stretched
If your desk is too high, your shoulders hunch to reach the keyboard; too low, and you lean forward and round your upper back.
Keyboard and mouse placement:
- Position your keyboard and mouse close to your body (about 4-6 inches from the edge of the desk)
- Your keyboard should be directly in front of you, not off to the side
- Your mouse should be at the same height as your keyboard, right next to it
- Keep your mouse close enough that you don't have to reach or extend your arm (Source: the National Institute for Occupational Safety and Health (NIOSH))
Reaching for your mouse is a common mistake: reaching across your desk rotates your torso, creating asymmetrical strain on your spine.
Step 4: Create Your Ergonomic Workstation Checklist
Use this checklist to verify your ergonomic home office setup is correct. Go through each item and adjust as needed.
| Setup Element | Correct Position | How to Check |
|---|---|---|
| Chair height | Feet flat on floor, knees at 90° | Sit and measure knee angle |
| Lumbar support | Supports lower back curve | Feel support at waist level |
| Monitor distance | 20-26 inches from eyes | Extend arm, fingertips should nearly touch screen |
| Monitor height | Top at or below eye level | Look straight ahead at center of screen |
| Desk height | Elbows at 90° when arms rest on desk | Measure elbow angle while sitting |
| Keyboard position | Close to body, directly in front | Reach forward without moving shoulders |
| Mouse position | Same height as keyboard, within reach | Reach without extending arm or rotating torso |
| Footrest | Feet flat on ground or footrest | Check that thighs are parallel to ground |
| Back support | Back against backrest | Sit upright without floating forward |
Print this checklist and post it next to your desk, checking it weekly for the first month. Small adjustments compound, a chair 2 inches too high or a monitor 6 inches too low seems minor until you've worked in that position for 8 hours.
Step 5: Add Desk Stretches for Back Pain Relief
Even with perfect ergonomics, sitting for 8 hours straight is hard on your spine. Regular stretches reduce muscle tension, improve circulation, and prevent stiffness from prolonged static posture.
These stretches take 2-3 minutes and can be done right at your desk:
Seated spinal twist (30 seconds each side)
- Sit upright and cross your right leg over your left knee
- Place your left elbow on the outside of your right knee
- Gently twist your torso to the right, keeping your back straight
- Hold 30 seconds, then repeat on the other side
Seated forward fold (30-45 seconds)
- Sit upright with feet flat on the floor
- Slowly fold forward from your hips, letting your arms hang
- Don't force it; let gravity do the work
- Feel the stretch in your hamstrings and lower back
Seated cat-cow stretch (10-15 reps)
- Sit upright with hands behind your head or crossed on your chest
- Arch your back gently, lifting your chest (cow)
- Then round your back, tucking your chin to your chest (cat)
- Move slowly between positions to mobilize your entire spine
Neck and shoulder rolls (10 reps each direction)
- Sit upright and relax your shoulders
- Roll your shoulders backward 10 times, then forward 10 times
- Gently roll your neck in circles (avoid dropping your head back)
- This releases tension in your neck and shoulders
Perform these stretches every 1-2 hours during your workday. They take minimal time but provide significant relief, and many people find they eliminate back pain that persisted even after fixing their ergonomic setup.
Movement Breaks and Posture Changes Throughout Your Day
Sitting, even in a perfectly ergonomic position, is not neutral for your body, your spine needs movement and variation.
Every hour, do one of these:
- Stand and stretch - Stand up, reach your arms overhead, and gently arch backward for 20-30 seconds
- Walk - Walk to get water, use the bathroom, or just walk around your home for 2-3 minutes
- Change position - If you have a standing desk, alternate between sitting and standing every 30-60 minutes
- Desk push-ups - Place your hands on your desk and do 5-10 push-ups to activate your back muscles
The key is variation: your body adapts to any single position within 20-30 minutes. Changing positions regularly prevents the muscle fatigue and strain that leads to pain.
Use a timer or calendar reminder to prompt movement breaks. Many people get so focused on work that they forget to move until they feel pain, by then, damage has accumulated.
When to Seek Professional Assessment for Back Pain
An ergonomic home office setup prevents many cases of back pain. But if you already have back pain, or if pain develops after optimizing your setup, professional assessment is important.
Back pain has many causes: postural (poor ergonomics, weak or tight muscles), structural (disc issues, arthritis, nerve compression), and systemic (fibromyalgia, autoimmune conditions).
Seek professional help if:
- Pain persists for more than 2 weeks despite ergonomic improvements
- Pain radiates into your legs, buttocks, or feet (possible nerve involvement)
- Pain worsens with certain movements or positions
- You have numbness, tingling, or weakness in your legs
At Alternative Health & Healing Center, we use Applied Kinesiology and advanced diagnostic techniques to identify the root cause of your back pain, postural dysfunction, muscle imbalance, nerve compression, or something more complex, rather than just symptoms.
An ergonomic home office setup for back pain is one of the most effective investments you can make in your long-term health.
Frequently Asked Questions
How do you sit in an office chair to avoid back pain?
Sit with your back against the backrest, feet flat on the floor or footrest, and knees at a 90-degree angle. Keep your shoulders relaxed and avoid slouching. Your lower back should rest against the chair's lumbar support, maintaining the natural curve of your spine. Position your monitor at eye level and your keyboard at elbow height so your forearms stay parallel to the work surface. These adjustments reduce pressure on the spine and prevent strain.
What is the best way to set up an ergonomic workstation checklist?
Start by measuring your body: seat height should allow feet flat on the floor with thighs parallel to it. Your desk height should position forearms at 90 degrees when hands rest on the keyboard. Monitor should be 20-26 inches away at eye level. Mouse and keyboard should be close together at the same height. Add a footrest if your feet don't touch the floor. Check that your chair provides lumbar support and is adjustable. Review this setup monthly as you may shift positions over time.
How often should you take breaks from sitting at a desk?
Stand and move for 5-10 minutes every 30-60 minutes of continuous sitting. During breaks, walk around, stretch your neck and shoulders, and change your posture. Prolonged static posture increases pressure on the spine and reduces circulation, even in a well-adjusted ergonomic workstation. Short movement breaks help maintain blood flow and reduce muscle fatigue. If you experience pain during sitting, take breaks more frequently and consider alternating between sitting and standing positions.
Can an ergonomic chair help with back pain?
Yes, when combined with proper desk setup and posture habits. An ergonomic chair with adjustable lumbar support, seat height, and armrests reduces strain on your lower back and supports the natural spinal curve. However, the chair alone is not enough, your monitor height, desk height, keyboard placement, and movement breaks all contribute to pain relief. If back pain persists after 2-3 weeks of proper ergonomic setup, consult a healthcare professional to rule out underlying conditions that may require clinical assessment.